Robitic Arm Configuration and Usage Tutorial
MCU Board
The upper-layer SOC communicates with the lower-layer MCU via CANBUS. This method calculates the set_tilt value on the upper layer and sends it to the lower layer through CANBUS to achieve chassis stability control.

AIRBOT(Qiuzhi)
Configuration
Airbot natively supports Ubuntu 20.04 and provides ROS1 compatibility. Install Docker on the NX using the tutorial: Docker Installation on ARM, If the system comes with Docker pre-installed, skip this step.
Docker image
pull docker image
docker pull registry.cn-guangzhou.aliyuncs.com/ddt_robot/airbot_on_tita:v1.0
This image includes ros-noetic and ros2-humble. Enter Docker using
docker run -it --rm --name airbot --privileged --cap-add=SYS_PTRACE -v $HOME/.ssh:/root/.ssh --network=host -v ~/manipulator:/workspace --workdir /workspace registry.cn-guangzhou.aliyuncs.com/ddt_robot/airbot_on_tita:v1.0 /bin/bash
Note
ROS environment variables (ros2-humble and ros1-bridge) are pre-configured in Docker - no additional setup needed.
Launch
Modify the ROS_DOMAIN_ID variable in Docker:
sudo vim ~/.bashrc
export ROS_DOMAIN_ID=69 # Match your TITA's actual domain_id
After configuring Docker, save the modified image:
# in tita host
docker commit airbot modify_airbot
Launch
Hardware Configuration
TITA Robot x1 Power Board x1 TypeC Cable x1 Airbot x1 Gripper x1 Gripper Cable x1
Connect hardware as shown:
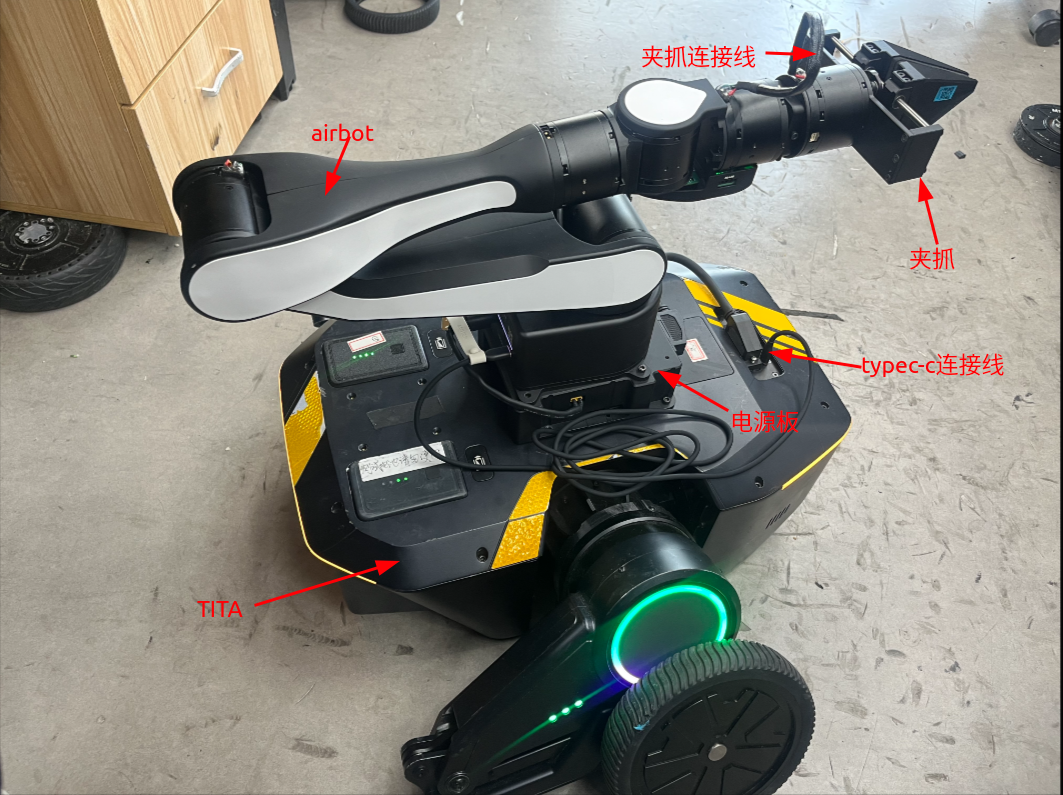
Software Configuration
SSH into TITA robot
ssh robot@192.168.42.1 # wire connected to host, if use wifi, check your tita ip address
Create workspace, pull code, and launch:
cd
mkdir manipulator && cd manipulator
git clone https://github.com/DDTRobot/airbot_on_tita
cd airbot_on_tita
bash docker_run.bash
# in docker container
source /opt/ros/noetic/setup.bash
catkin_make
bash can_up.bash # success if print "can1 up success"
bash ros_run.bash # launch ros_interface of airbot
# if in terminal print such as :
# terminate called after throwing an instance of 'std::runtime_error'
# what():  AIRBOT Play needs to be calibrated. Please run airbot_auto_set_zero or airbot_set_zero
# please kill with `Ctrl+C` and run with `airbot_set_zero -m can1` to set arm to zero position
# more information of airbot please refer to https://discover-robotics.github.io/docs/latest/AIRBOT-Play/tutorials/env/
Note
A “click” sound indicates successful startup. After compilation, use bash one_start.bash on the host.
Control manipulator via remote (Optional):
Note
Remote cannot control robot while operating manipulator.
New terminal → SSH into TITA:
mkdir -p airbot_joy/src && cd airbot_joy/src
git clone https://github.com/DDTRobot/airbot_joy
cd ..
colcon build
source install/setup.bash
ros2 launch airbot_joy airbot_joy.launch.py
Remote control mode setup:
Press right button above remote screen to enter menu
Select second mode (user-sdk mode, marked with “*”)
Left joystick: XY-axis control | Right joystick: Z-axis | Bottom-right button: Reset arm
Chassis/arm control are decoupled: Non-SDK mode controls chassis, SDK mode controls manipulator only
Shutdown Procedure
Connect robot to computer, open terminal
SSH into robot
Stop manipulator:
docker exec airbot pkill -SIGINT -f "roslaunch ros_interface airbot_arm.launch"Stop
docker:docker stop airbot
Note
Restart manipulator by rerunning one_start.
常见问题:
CANBUS failure due to can0/can1 device assignment Solution:
Power on robot and wait for full boot
Connect Type-C cable afterward